¶ Overview
This beginner course enables one to program their own GameMaker game following Phame best practices.
¶ Curriculum
- Choose a game idea of reasonable scope
¶ Course
¶ Introduction
If you're interested in programming, but have no experience with GML or programming in general, you're in the right place! Here we'll be doing a quick rundown of how to program in GML with a few tutorials along the way to help you out. Our goal is to teach you the basics, so you can create your own games. Throughout the tutorial you can hover over images to get a little more information about them. Let's dive right in!
¶ GameMaker
Let's start at the very beginning. GML stands for GameMaker Language, the coding language for GameMaker. GameMaker is an IDE or Integrated Development Environment. That's just the place where you type in your code. Don't have GameMaker? Download it here (You may need to make an account for this). GameMaker helps you organize your code and takes care of lots of the tricky organization stuff for you. More on that soon. But first:
¶ How Code Works
Code is just instructions for the computer. The computer can't make our game happen unless we tell it exactly what to do. That "exactly" is the tricky part. See we can't just say "Hey computer, I want the player to move around when I press the arrow keys." The computer would have a lot of questions:
- How fast should the player move?
- Do you want the up arrow to go left?
- Which player are you talking about?
Instead we have to give the computer very specific instructions. We tell it Who? Where? What? When?
If your computer asks "why?" I recommend running for the door (or say "cause I said so", that'll teach it).
For example, to move a player to the right on the screen you need to tell the computer:
- Who should be moving?
- What speed and direction should they be moving?
- Where is this player going to start and end?
- When do you want this to happen?
Answering each one of these questions every time you want to do something would be exhausting. That's why we have GameMaker to help us out. It will help us answer these questions for the computer by how we organize our code. The who? and where? are usually taken care of by the upper level organization (explained next), the when is answered by the event and the what? is in the code itself. Let's take a quick look at each of these.
¶ Upper Level Organization
GameMaker has different resources for you to use, these are specially made to make game making easier. The resources are as follows:
- Sprites - The images that make up your game: the player, the enemies, walls, coins, bullets, everything! If you want it to appear on the screen, you'll probably need to make a sprite for it.
![]()
- Objects - Where you'll be doing most of your coding. The objects are the things you'll be telling to do stuff: the player, the enemies, walls, coins, bullets, etc. Most objects will be assigned a sprite so the player can see them in the actual game.
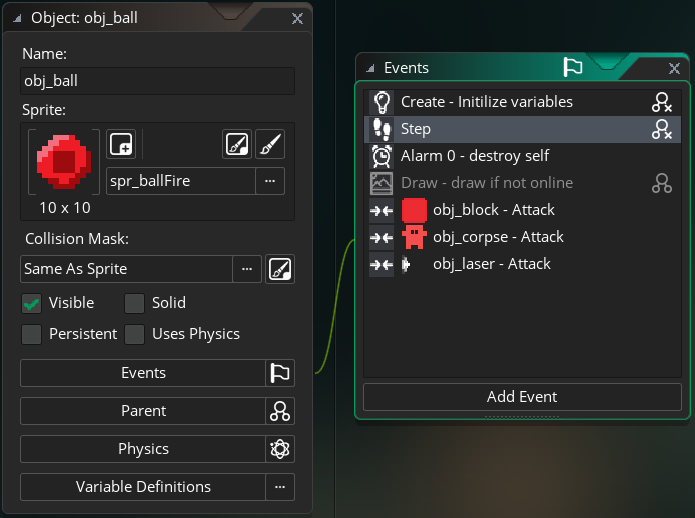
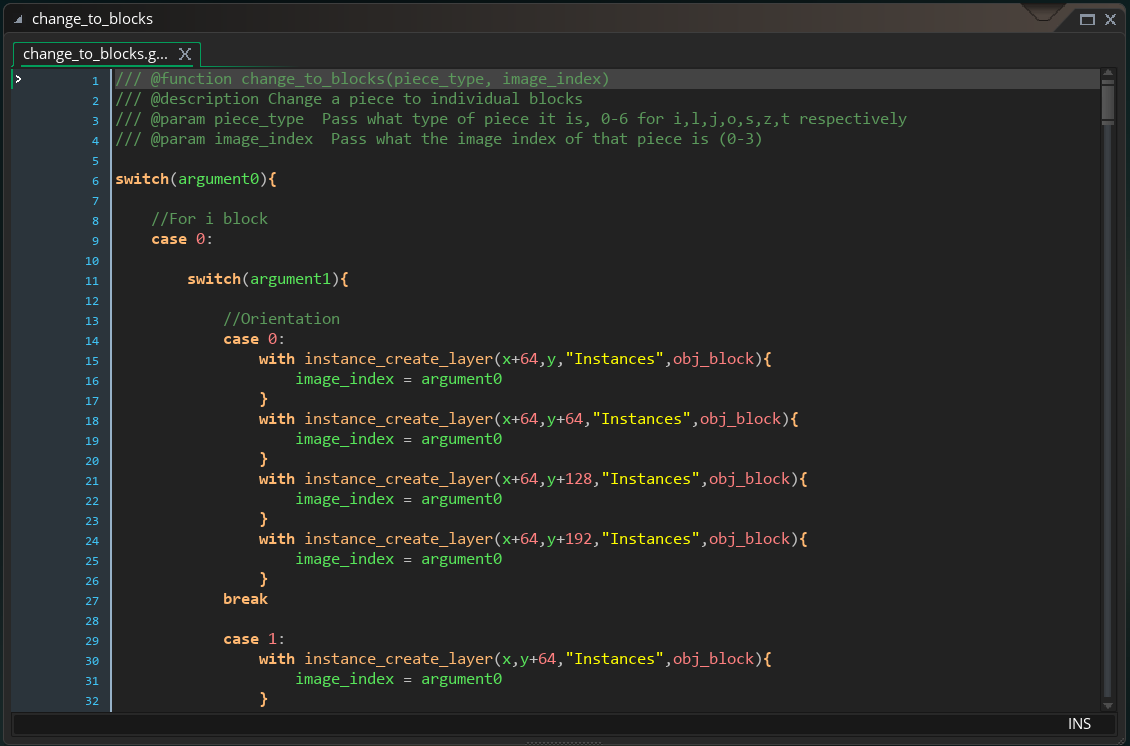
- Scripts - Functions or modules in other coding languages. These are just bits of code you want to use a lot. They usually take in some inputs, do something with them, and then give an output. Lots more on these later.
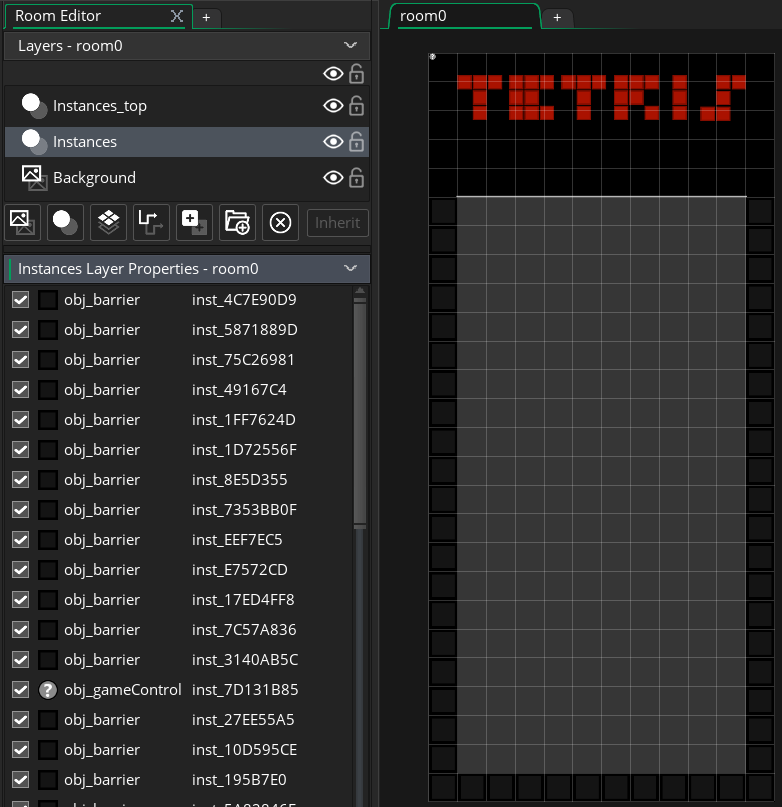
- Rooms - Where the game takes place or the 'screen' the player will see. The room here is shown on the right with a grid, some information about what's in the room is on the left.
As a quick rundown then, you might create an object, such as the player, assign it a sprite (a little person perhaps), give the object some code and maybe have it run a few scripts that tell it to move when a key is pressed. Finally you might place that object in a room so it has some place to move around in. Voila! You have a little game!
There are more resources than this, but these are the ones you'll be using most as a beginner. Next we'll talk about the language basics.
¶ Variables
The most important concept in programming is understanding variables. If you remember from school, a variable is something (like a letter or word) that stands for something else (like a number or sentence). For example in the statement a = 7 we have a variable a set equal to a number 7. In coding, we often use words for our variables. For example we might have a variable called lives that tells the computer how many lives the player has and we might want to set it to 3. How do you think we would do that? Go ahead, take a guess and then click on the answer to see the answer.
Answer
lives = 3
Ta-da! The object I typed this in now has 3 lives! Of course this doesn't mean anything until we make it lose lives and die when it runs out of lives, but its a start. Let's do another one. This time let's set how high the player can jump. We'll call this variable jump_height and we'll set it to 10. I'm sure you got this but go ahead and check.
Answer
jump_height = 10
You'll notice I called the variable for jump height jump_height. There's a few important things to note here. First, we try to be as descriptive as possible when naming our variables. I could call the variable lemur and the computer wouldn't care, but you might be confused when you try to read your code later on. Next, we have a specific way of typing our variables; we make them all lowercase with underscores _ instead of spaces (this is called "snake case"). By following a few simple rules (called "Style") you make it easier for yourself and others to read your code and find mistakes. That's a good thing so we try to do that. You can find a style guide here. Okay there is more to variables so let's keep learning.
¶ Data Types
GML, like all coding languages, has many different things you can assign to variables. Some of these are:
| Type | Example(s) | Explanation |
|---|---|---|
| Numbers | 0 2.45 -1000 |
All numbers, integers, decimals, positive, and negative |
| Strings | "Hello" " " "What is up?" |
Anything in quotation marks (single quotes or double) |
| Booleans | true false |
Just true or false |
For example we might want to set the name of the player. We can do that like this:
player_name = "Bobby"
I just assigned a variable called player_name a string with the value of "Bobby". Variables can be assigned any data type, not just numbers!
Here's another statement we might use if we don't want the player to be able to jump.
can_jump = false
This is called a boolean and it can either be true or false.
In every case, the variable is on the left of the equal sign and what we want the variable to be is on the right side. When we give a variable a value it is called assignment.
move_speed = 27
27 = move_speed
¶ Mathematical Operators
Okay, back to the first example lives = 3. I said it didn't matter if the player had lives if he couldn't lose them. Let's try using an operator to change the variable. Some operators are:
| Operator | Purpose |
|---|---|
| + | Add |
| - | Subtract |
| * | Multiply |
| / | Divide |
| = | Set equal to |
So say we want to use - to get rid of a life. We type:
lives = lives - 1
Wait, why not just lives - 1? Because really we are doing two things. First we are subtracting one from lives then we are assigning this new value to the lives variable. Said another way, just typing lives - 1 will give you a result of 4, but the problem is that 4 does not belong to the variable lives. If we want lives to change we have to assign the new value (lives - 1) to the variable lives. Now if we were to check the value of lives it would give us 4.
Side note: this code is a little clunky, when we are changing the value of a variable we can use a little shortcut to set a variable equal to itself - 1. Instead of
lives = lives - 1we could typelives -= 1which means set lives equal to itself minus 1. This works with the other operators too+=,*=, and/=.
Cool! The player lost a life. But now we want the player to die if he is all out of lives. To do that we need logical operators and our first control statement: the if statement.
¶ Logical Operators
Logical operators are one of the most commonly used things in coding. You've seen them before in math plenty of times, they are:
| Logical Operator | Purpose |
|---|---|
| < | Less than |
| > | Greater than |
| == | Equal to |
| != | Not equal to |
| <= | Less than or equal to |
| >= | Greater than or equal to |
These operators are often used in an if statement. This just says if a condition is met, then do the things I include in braces {}. They look like this:
if condition{
    Do Thing
}
Let's try it with our lives problem. We want the player to die (or disappear) if they have less than one life. So we use:
if lives < 1{
    instance_destroy()
}
The variable lives being less than 1 is the condition, destroying the instance (deleting the player from the room) is the action. The parentheses after the instance_destroy indicate that its a function, which means its doing some things behind the scenes we aren't seeing. We won't worry too much about that for now though. Let's say we want to try it different way and destroy the player when the lives are equal to 0. How would you do it? Click to see the answer.
Answer
if lives == 0{
    instance_destroy()
}
Did you remember to use == for checking to see if two values are equal? Did you remember the braces?
Okay here's another one. Let's say you have defined a variable speed and another variable max_speed. You want to check if speed is greater than max_speed. If it is, you want to set speed to be equal to max_speed. Essentially this is an upper speed limit for your character. So what do you type?
Answer
if speed > max_speed{
    speed = max_speed
}
Don't forget = when assigning a variable, == when comparing.
A quick but important note. Sometimes you'll want to do something else if the condition is not true. To do that use an else statement. That looks like this:
if speed < 5{
    speed += 1
}
else{
    speed = 5
}
This code will increase the speed to 5 if it's less than 5, else it will set the speed to 5. Only one of those two things will happen. Either the speed will be increased by 1 OR the speed will be set to 5.
These examples have all been comparing a variable to a number, but you could check a boolean (true or false) value. For example:
if is_alive{
    score += 1
}
Note:
if is_aliveis the same asif is_alive == trueIn both cases you're checking to see ifis_aliveis true.
Here is_alive is a boolean value that could be either true or false.
Good. That's a good portion of beginner programming. Now let's figure out where you're typing this code at.
¶ Events
Events are contained in objects. Typically the event tells the object when to execute that code. Here is the event list in GMS 2:
 event-list.png](/event-list.png)
Each event provides an editor for the programmer to type code in that appears to the right of the object editor. It looks like this:

The events have the following function:
| Event | When the code is performed |
|---|---|
| Create | When the object (or instance) is created) |
| Destroy | When the object (or instance) is destroyed |
| Clean up | At the room end or game end |
| Step | Constantly. Specifically at every "step" (each step is usually 1/30th of a second) |
| Alarm | When the alarm goes off |
| Draw | At every step, but made specially for draw functions |
| Mouse | When a specified mouse button is clicked |
| Key down | Every step the specified key is held down |
| Key pressed | Once every time the specified key is pressed |
| Key up | Once every time the specified key is released |
| Gesture | Whenever a specified gesture is done |
| Collision | When a specified object collides with another specified object |
| Other | Some other times code can be performed |
| Asynchronous | Some other special times code can be performed |
Phew. This seems like a lot but the events are pretty self-explanatory and which to use will come naturally with some practice. The important thing to remember is this is where you will be typing a code for a specific object. The event is when it happens, the code you type is what will happen.
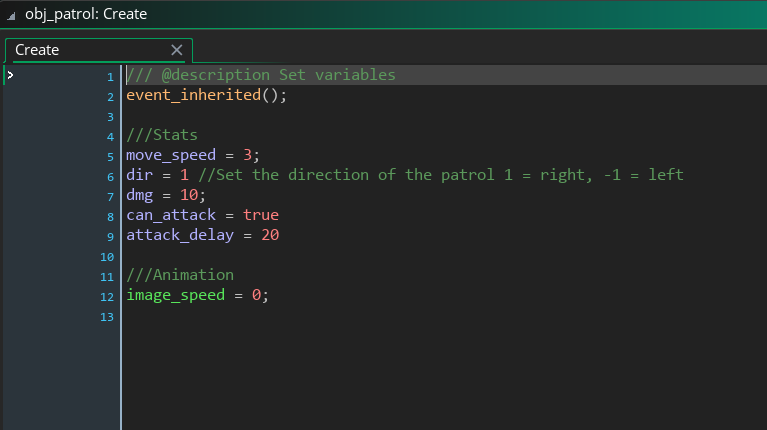
Now let's try a little test. If you made an object, we'll say its called obj_player and we want to set its lives to 5 at the beginning of the game, where do we do this? That is, in which event? The create event. Since the objects placed in a room are "created" at the beginning of the game, all their create code will run when the room starts (typically when the game begins).
Okay, your turn, where do we type our code if we want to check if the player is dead? That is if lives < 1. Say the player could die at any time.
Answer
The step event. When do we need to check if the player is dead? All the time. So we use the step event to run the life check constantly.
¶ Loops
One more topic to cover before you can really start programming. Loops are what makes computers so great. With these loops we can perform code over and over a certain number of times or until a certain event occurs. There are two main loops for loops and while loops.
¶ For Loops
For loops perform code for a certain number of times. They are set up a little strangely, but not too complex. Here's an example.
for (var i=0; i<10; i+=1){
    count += 1
}
What does this mean? Let's break it down.
The first line sets up the loop with three sections separated by semicolons:
- Declaration
var i=0 - Condition
i<10 - Increment
i+=1
Let's break this down.
In the declaration, we assign counter variable to keep track of how many times the loop has run. The variable is i and we are going to start counting at 0. This is only run the first time the loop is run. The var means that this is a local variable and only applies to this event. We'll talk about that more in Variable Scope later.
The condition is what decides if the actions in the loop should be performed or not. This i<10 means the same as if i < 10, we just shorten it in for loops. Since i starts at 0 the loop will run at least once.
The increment tells the computer how much to increase our counter variable i each time after the loop is run. In this case, i will be increased by 1 each time the loop is run.
Finally, just like with if statements, any actions in the braces {} will be performed. In this case we are just increase a variable count by 1.
So how many times will this loop run? i starts at 0, increases by 1, and runs until i is no longer less than 10. So it runs when i is 0, 1, 2, 3, 4, 5, 6, 7, 8, 9. So 10 times in total.
So if the count variable starts at 0 it would end at 10 when the for loop finished. Of course you could just set count = 10 so let's look at a more practical example:
var i
for (i=0; i<5; i+=1){
    create_instance_layer(16 * i, 16 * i, "Instances", obj_wall)
}
Okay, so we can see this loop is going to run 5 times, from when i = 0 to when i = 4. What does it do? The instance_create_layer() function places an object in the room at a certain (x,y) coordinate. The x and y coordinate given here are both 16 * i. i changes each time the loop is run. So this loop will create an obj_wall at (0,0); (16,16); (32,32); (48,48); and (60,60) in the room.
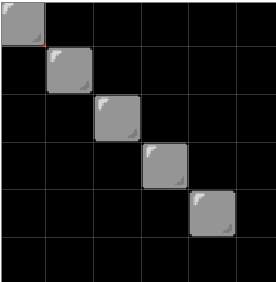
Your turn. Write a for loop that will run 8 times. Each time the loop runs multiply a variable called big_number by 5 and set big_number to that new value.
Answer
var i
for (i=0; i<8; i+=1){
    big_number *= 5
}
Hopefully you got that, if not, you can learn read more here.
¶ While Loops
while loops are more uncommon in GameMaker since they specify a certain time code should be executed, which, if you recall, is also what events do. The danger is including a loop that runs infinitely which would freeze the game. Still they are useful sometimes. The syntax is like this:
while (i > 10){
    i -= 1
}
This while loop is basically a for loop. As long as the i is greater than 10, it will be reduced by 1 until it reaches 10.
¶ Variable Scope
Variable scope means the where a variable is defined. There are three levels at which a variable can be defined. From lowest to highest:
- Local variables
- Object variables
- Global variables
¶ Local Variables
Local variables are variables that only last as long as the block of code they are defined in lasts. We just used some local variables when talking about for loops. The local variable was i and we used it to count how many times the loop was run.
Local variables are declared with the keyword var as in var i = 0.
Once the block of code is over, the variable is undefined. For example:
if health < 10{
    var warning = "Warning: You are low on health!"
  draw_text(0, 0, warning)
}
The warning variable here is local. It only exists inside the if statement. If we placed a reference to warning outside the if statement we would get an error.
if health < 10{
    var warning = "Warning: You are low on health!"
}
draw_text(0, 0, warning)
Error:
warningis undefined.
Local variables are used when you don't need to reference the variable anywhere else, like in a different object or event.
¶ Object Variables
Object variables are typically defined in a Create event (The event that runs once as soon as the object is created). These variables can be referenced in any event but only in the object where they are defined.
For example, if you set lives = 5 in the Create event of obj_player you can check if lives < 1 in the Step event or draw_text(0, 0, lives) in the Draw event. However, you won't be able to call lives in say, obj_wall. Since the wall doesn't need to know how many lives the player has, this variable is probably a good Object variable.
¶ Global Variables
You may want a variable to be available everywhere. Let's say you're making a game where the gravity frequently turns on and off, affecting not just obj_player but lots of other objects as well. Here you can use a global variable.
To set this, you type global.gravity = 10 in any object's Create event. You may have an obj_control to keep all these global variables together. Now when you change the gravity with a line like global.gravity = 0 it will affect all objects, not just the one global.gravity is initialized in.!
¶ Creating resources
Creating resources is simple. The right side of GameMaker Studio lists all the resources. Simply right click on a resource and select Create. For example, to make an object, right click on objects and hit create.
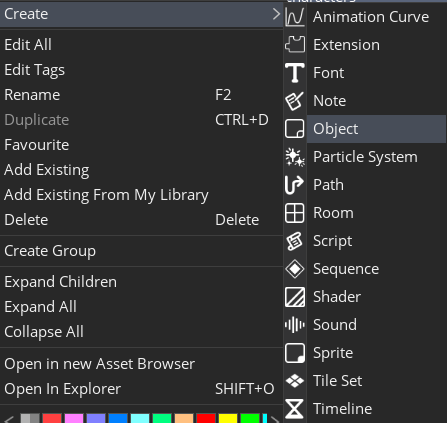
The same can be done for sprites, scripts, rooms, etc.